NetTool is a developer tool for debugging and testing networked applications, with a specific emphasis on webapps and web services (i.e. HTTP-based applications).
NetTool currently consists of two distinct tools: HTTP Client, and TCP Tunnel. See below for details on each.
NetTool was created by Neil O'Toole.
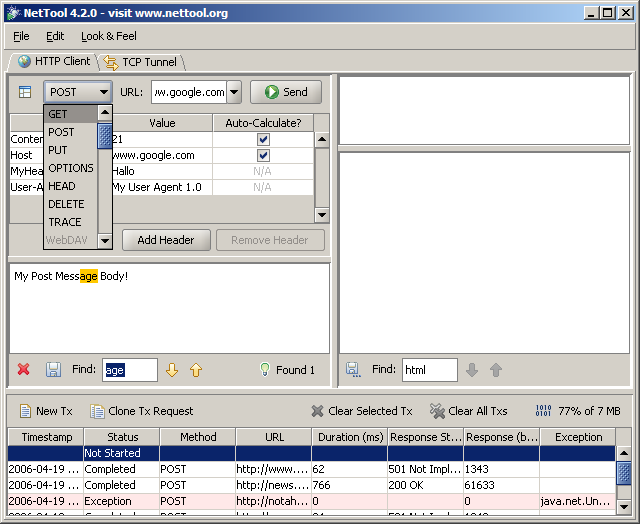
The HTTP Client is analogous to a web browser, except that the user can control the exact format of the HTTP request. The user can specify the request URL, HTTP method, request headers, and message body (where applicable, e.g. when using the POST method). The HTTP Client supports both HTTP and HTTPS. Note that the current HTTPS implementation does not perform any SSL validity checking (i.e. is the server cert trusted?; does the cert match the hostname?; has the cert expired?; etc.), and there is currently no mechanism to support two-way SSL (client and server cert authentication).
Note some of the features above. The Transaction History Table at the bottom of the screen displays a summary of the HTTP transactions that have been executed by this client. Click on any of the entries to display that transaction in the main view. If an exception occurred during the transaction, the entry is highlighted in red (you can mouse-over the exception text in the table to see the full exception text). If a transaction is still active (i.e. the client is still receiving the response, the entry is highlighted in green.
To create a new HTTP transaction, click the New Tx button, creating a new, blank HTTP request. Or, select an entry in the table and click the Clone Tx Request button. This will create a HTTP request with the same URL, HTTP method, request headers, and request body as the cloned transaction. When you are ready to send the HTTP request, press the Send button near the top of the screen. The HTTP response will display on the right hand side, with the HTTP response headers in the top text area, and the HTTP response body in the bottom text area. Note that once the HTTP request has been sent, the Send button changes to a Clone button, to facilitate quicker sending of multiple messages.
Note that the HTTP request headers table allows the user to enter custom headers. Also note that for certain standard HTTP headers (specifically Content-Length and Host), NetTool will auto-calculate the header value if the Auto-Calculate checkbox is selected. There is also a memory usage widget that shows the amount of memory consumed by NetTool; click the widget to run the Java garbage collector. The rest of the user interface is pretty self-explanatory; there is a text search function; the response body can be saved to file; the request body can be loaded from file (or drag n' dropped into the text area); the transaction history table can be cleared, and so on.
The TCP Tunnel allows the user to view TCP traffic, e.g. HTTP messages between a browser and web server. This is accomplished by directing the TCP traffic through a tunnel. The
concept is best explained using an example. Our scenario is that we want to view the HTTP traffic between the web browser and a web server (in this case, www.google.com).
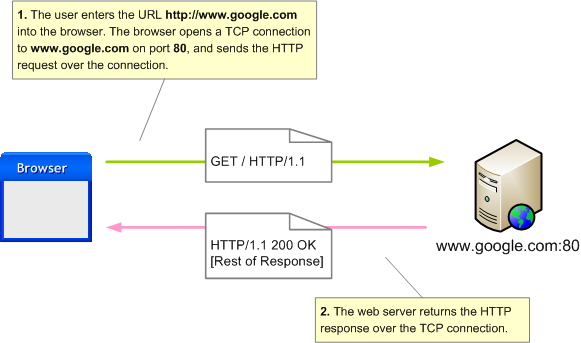
The diagram above illustrates the normal mechanism by which the browser opens a connection to the web server at www.google.com on port 80 (the default port for HTTP).
Pretty simple stuff. So how do we get to view the HTTP traffic?

The first step is that we set up a TCP Tunnel (usually on your local machine, aka localhost) to listen on a specific port, 7000 in this example.
7000 to the destination, which is www.google.com, port 80. http://www.google.com
URL into the browser, the user enters http://localhost:7000. The browser opens a TCP connection to localhost:7000, and sends the HTTP request over the connection.7000 from the browser, and "tunnels" the request to www.google.com:80, and vice-versa with the response. The user
can then see the traffic in the TCP Tunnel view.There is one caveat with this particular example: the web server expects the HTTP request to contain a Host header with correct DNS name of the web server (www.google.com).
But since we entered the URL http://localhost:7000, the browser (such as Firefox or IE) will set the Host header to localhost. There's no really easy way around this with the common browsers. However, if you're using NetTool's HTTP Client, you can manually set the Host header value to www.google.com, allowing you to execute the example as above. But now that the explanations are out of the way, on to using the TCP Tunnel!

The user interface for the TCP Tunnel is even simpler than the HTTP Client. At the top the user can specify:
7000 in the example above)www.google.com)80).Some quick acknowledgements: NetTool incorporates code and libraries from various Apache projects, in particular Jakarta Commons HTTP Client, so I'd like to thank those people for their work. It also uses the JGoodies Looks library for the UI, and those people really really deserve thanks for taking the ugly off of Swing. If you have any comments, bug reports, or would like to see new features, please feel free to contact me.